 Back to Blog
This is a walkthrough of scheduling an SMS campaign inside ShoutOUT Engage — the actual screens, fields, and buttons, not a general description of “why plan ahead.” If you’ve never created a campaign before, start here; if you already know the interface and just need the pre-send checklist or how to change a scheduled campaign, skip to those sections.
Before you start
You’ll need:
- At least one segment or contact group already built in Engage (or you can use “All Contacts”).
- A sender configuration (your approved sender ID or number) already set up.
- The message content ready, including any personalization fields (like
{{name}}) you plan to use.
Step 1: Open New Campaign
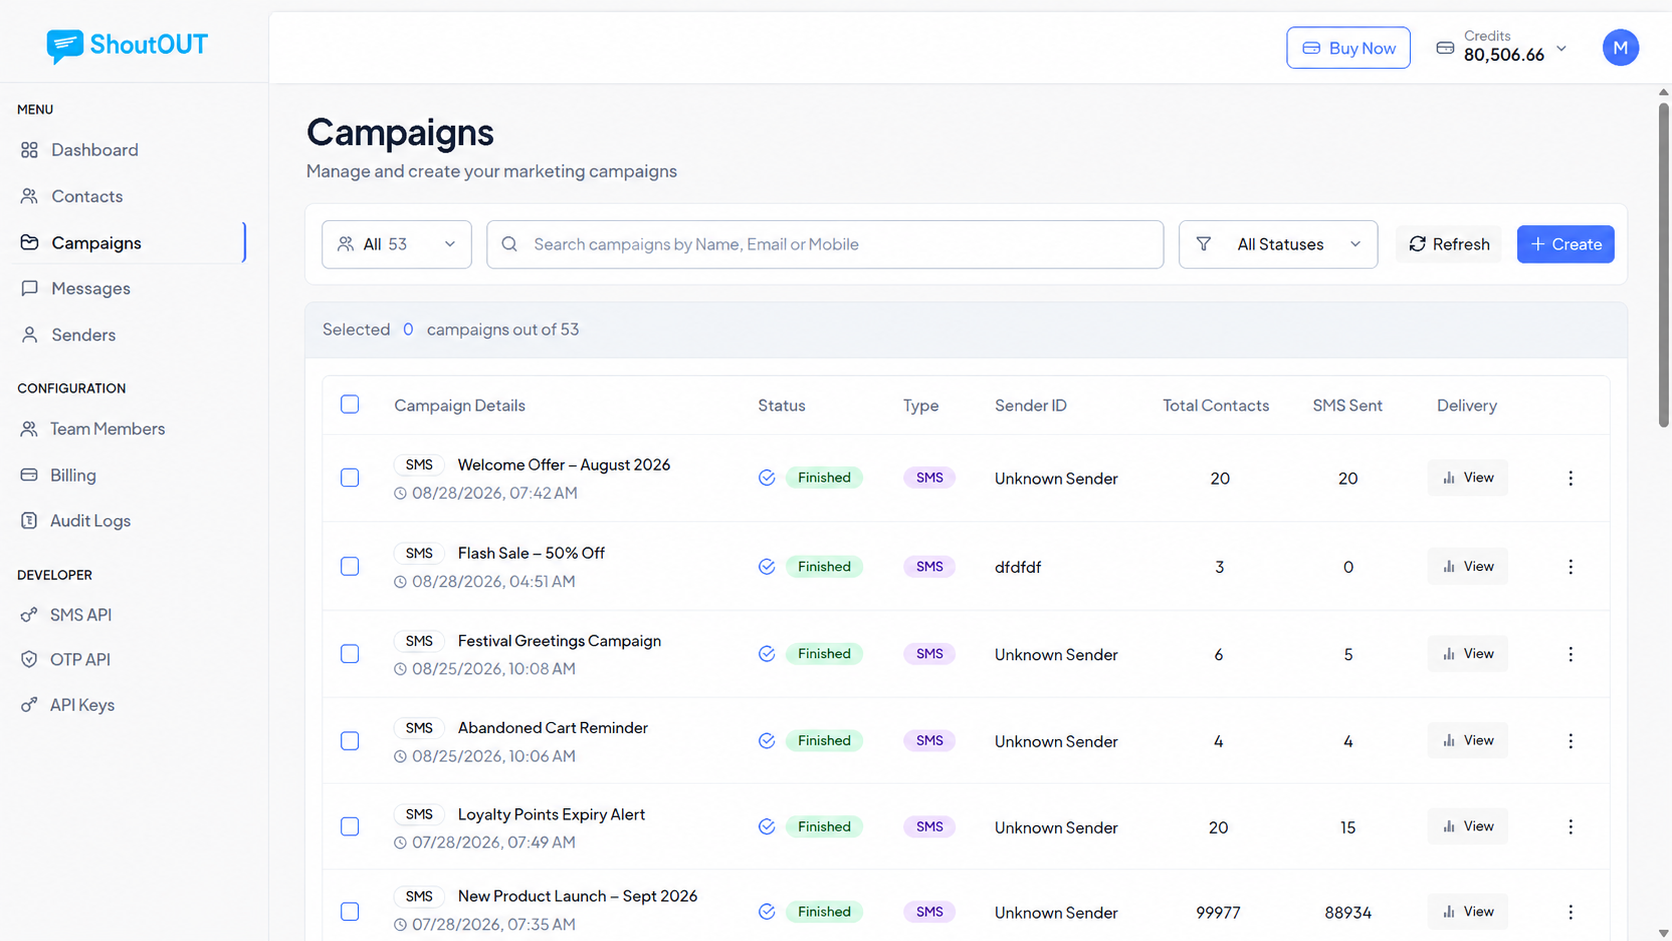
From the Engage dashboard, go to Campaigns, then click New Campaign. This opens a dialog with three steps across the top: Setup → Design → Confirm.
Step 2: Setup — name, audience, and schedule
On the Setup step:
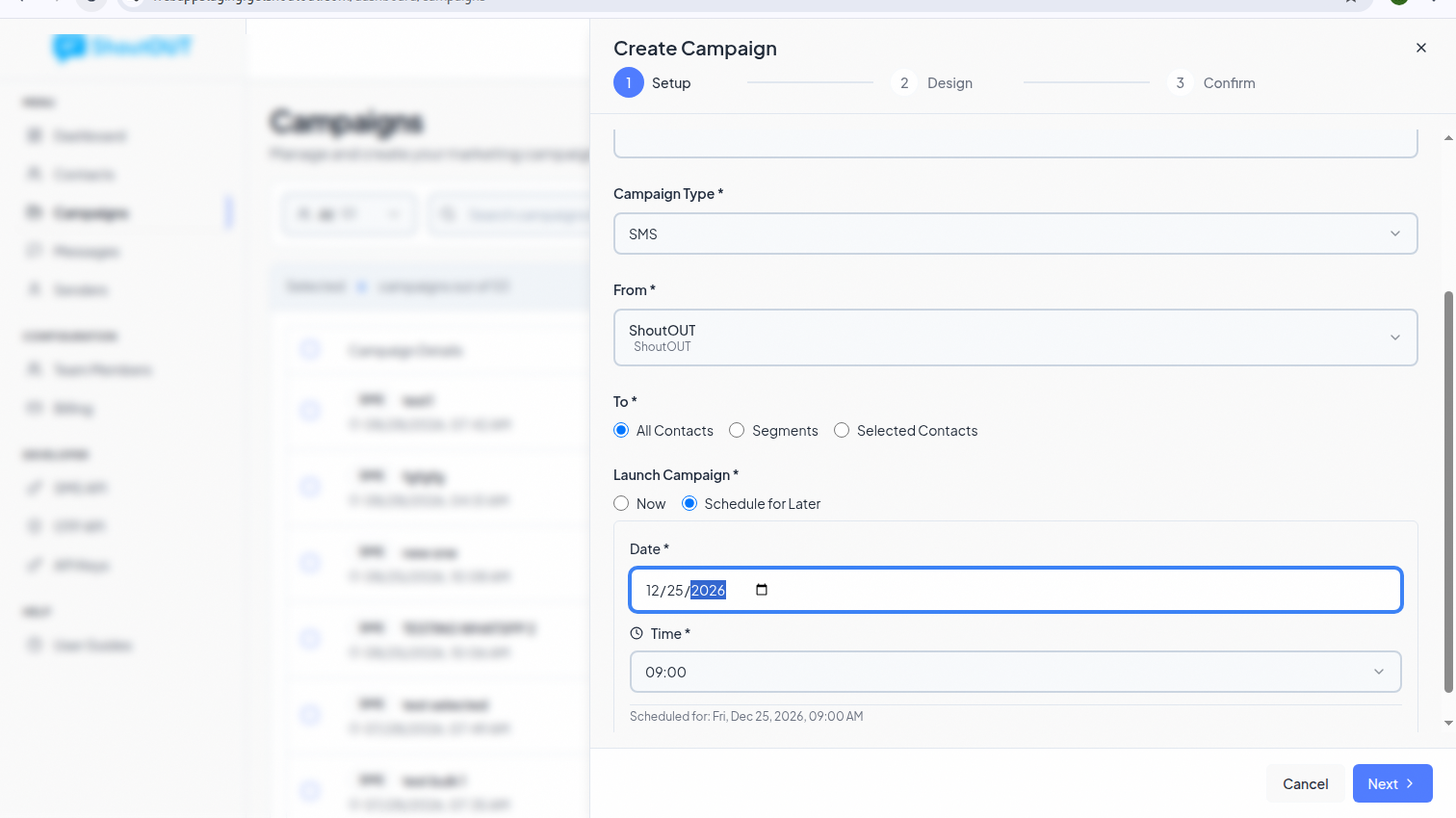
- Enter a campaign name and optional description — use something you’ll recognize later in the campaign list, not just “Campaign 1.”
- Select the campaign type (SMS).
- Choose your sender configuration from the dropdown.
- Choose your audience: toggle between All Contacts and Segments. If you select Segments, a multi-select list appears — pick one or more segments built from your contact filters.
- Toggle Schedule for Later on. This reveals a date-and-time picker — set the exact delivery date and time here. Leaving this off sends the campaign as soon as you confirm it in Step 4, so this toggle is the actual “schedule” action.
Click Next to continue.
Step 3: Design — write the message
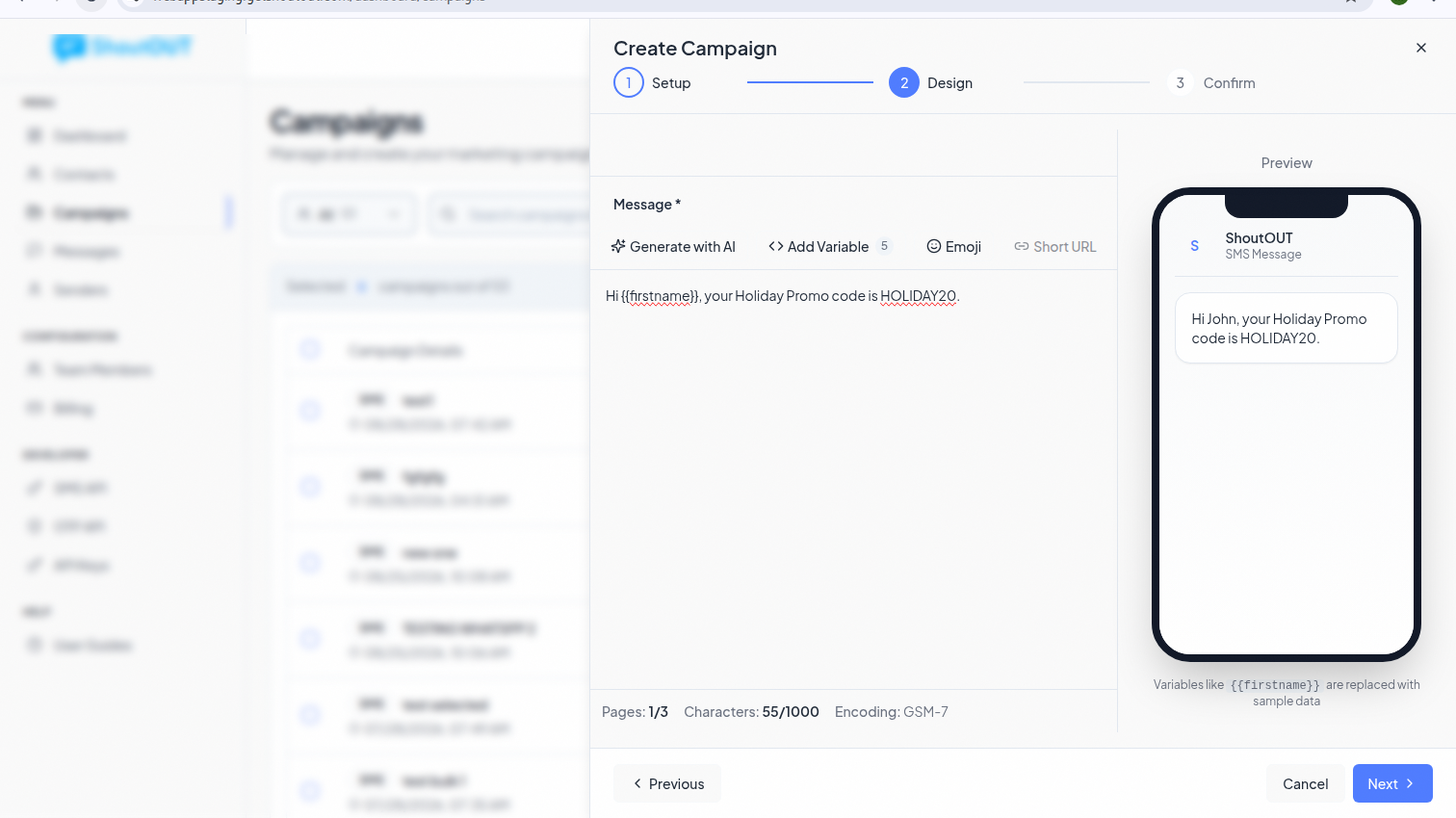
On the Design step, write your SMS content in the message editor. If you’re using personalization, insert your attribute placeholders (e.g. {{name}}, {{appointment_date}}) directly in the text. The panel on the right shows a live preview of the message — use it to check length and how placeholders will render before moving on.
Worked example — appointment reminder campaign:
- Audience: Segment “Upcoming Appointments — This Week”
- Message:
Hi {{name}}, this is a reminder for your appointment on {{date}} at {{time}}. Reply RESCHEDULE if you need a new time. - Schedule: the evening before each appointment date, sent as a recurring segment-based campaign
Worked example — event promotion campaign:
- Audience: Segment “Newsletter Subscribers — Local”
- Message:
Hi {{name}}, our fall sale starts Friday! Get 20% off in-store or online: {{link}} - Schedule: 8:00 AM on the day the sale opens, in the audience’s local time zone
Click Next to continue.
Step 4: Confirm — review before it locks in
The Confirm step shows a full review: sender name and address, audience (segment names or “All Contacts”), message content, and the scheduled date and time. This is your last chance to catch a mistake before the campaign is queued.
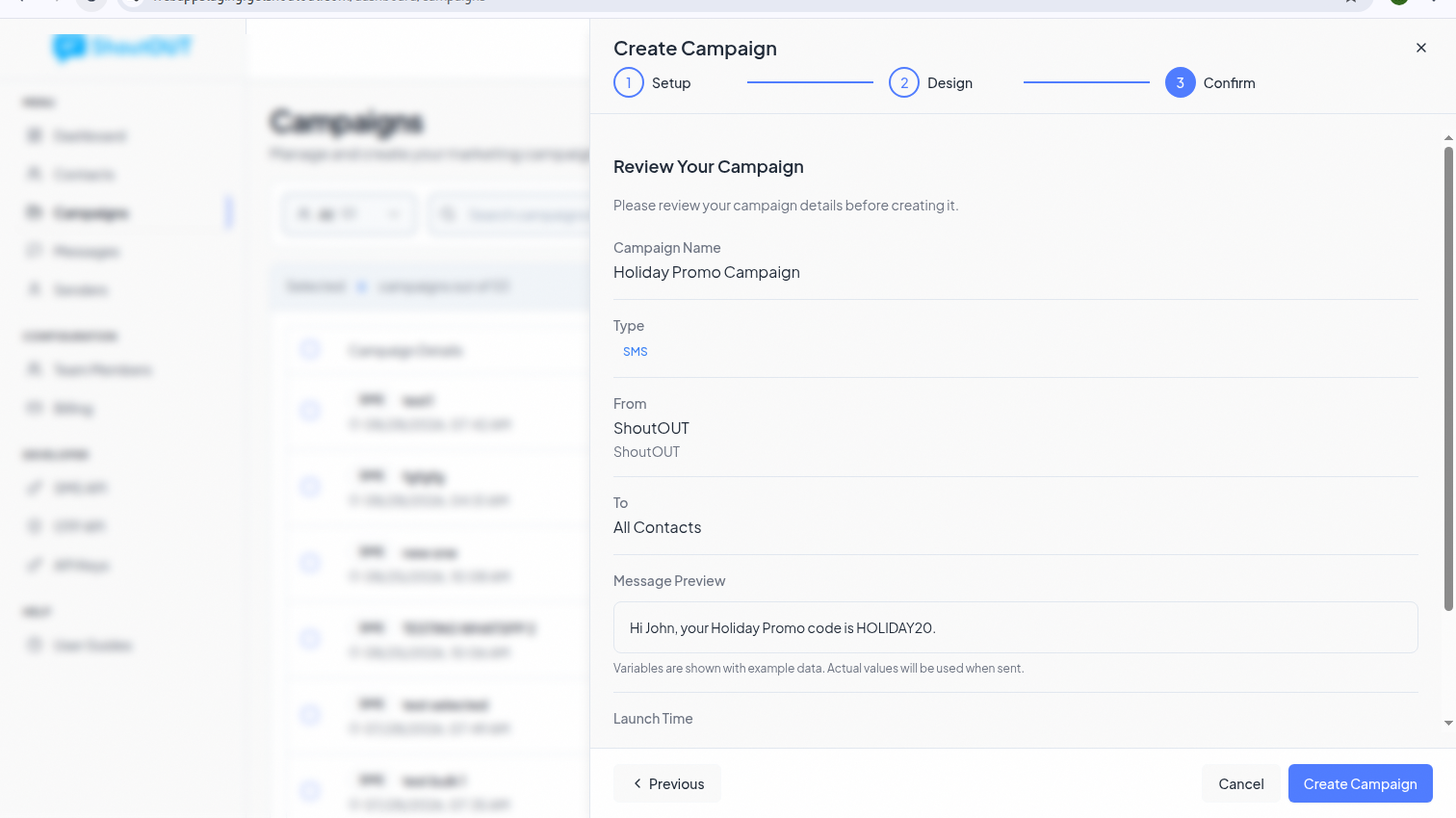
Run through this checklist before clicking Confirm:
- Is the correct segment or “All Contacts” selected — not a leftover from a previous campaign?
- Does the message preview show personalization fields resolving correctly?
- Is the scheduled time in the audience’s relevant time zone, not just the time zone you’re sitting in?
- Does the link (if any) go to a live, correct destination?
- Is the sender name recognizable to the recipient?
Once confirmed, the campaign moves to Scheduled status and will appear in your campaign list with that status until it sends.
Time zones: check this every time
The schedule picker uses the time you set, but if your audience spans multiple regions, a single scheduled time won’t land at the same local hour for everyone. For a single-region audience, pick a delivery window that makes sense locally (for example, mid-morning rather than the middle of the night). For a multi-region audience, either split the campaign into segments by region and schedule each at its own local time, or accept that the send time will be more convenient for one region than another and choose the larger group.
Editing or cancelling a campaign after it’s scheduled
Plans change. In the campaign list, a scheduled campaign (status: Scheduled) still has an Edit Campaign option in its row menu — use it to update the audience, message, or time before it sends. If the campaign should not go out at all, use Delete to remove it from the queue.
Two things to check when a campaign’s status is Pending or In Progress: at that point the send may already be underway, and editing or deleting may no longer be possible or may only affect contacts not yet reached. If you’re not sure whether a change will apply in time, treat “in progress” as already sent.
Common mistakes and how to recover
- Wrong segment selected. Caught before the scheduled time: edit the campaign and swap the segment. Caught after it sent: there’s no unsend — plan a follow-up message to the correct segment and, if appropriate, a short correction to the group that received it in error.
- Broken or wrong link in the message. Caught before sending: edit the message in the Design step. Caught after: send a follow-up with the corrected link; note the mistake so it’s easier to explain if anyone asks.
- Scheduled time in the wrong time zone. If it hasn’t sent yet, edit the schedule. This is why the pre-send checklist explicitly separates “your time zone” from “the audience’s time zone.”
- Forgetting to toggle Schedule for Later. The campaign sends immediately on confirmation instead of at the intended time. If you catch it right after confirming and the campaign status is still Pending, try deleting it immediately and rebuilding it with the toggle on; if it’s already sending, it’s too late.
Where this fits with the rest of your campaign setup
Scheduling is one part of campaign setup alongside audience segmentation and personalized message content — a scheduled send is only as good as the segment and message behind it. See the ShoutOUT Engage campaign management platform for how these pieces connect.
FAQ
Where exactly do I turn on scheduling for a campaign?
In the Setup step of the New Campaign dialog, toggle Schedule for Later on. This reveals a date-and-time picker; without it, the campaign sends immediately when you confirm it.
Can I edit a campaign after it’s scheduled?
Yes, as long as its status is still Scheduled. Use Edit Campaign from the campaign list’s row menu. Once a campaign moves to Pending or In Progress, editing may no longer apply to contacts already reached.
How do I cancel a scheduled campaign?
Use Delete from the campaign’s row menu in the campaign list while its status is still Scheduled.
What happens if my audience is in different time zones?
A single scheduled time lands at different local hours for each region. Split the campaign by region-based segments and schedule each at its own local time, or pick one delivery window that best serves your largest audience segment.
Can I schedule a campaign with personalized content?
Yes. Insert your placeholders (like {{name}}) in the Design step and check the live preview panel to confirm they resolve correctly before scheduling the send.


 Capterra
 Software Advice
 G2 Crowd
 Gartner